Thursday, September 20, 2012

Farewell Summer ~ S'mores Cookie Bars

Hey friends! I know it's been a while and I'm sorry I've been MIA. I'm getting over some yucky sickness and am ready to share a delicious recipe to celebrate the ending of summer. First, I want to wish my beautiful mom a happy birthday! I am so blessed to have such an awesome mom and don't know what I'd do without her!! (Birthday cupcakes will be posted later this week...)

As it draws closer to fall, we have just a few evenings left to enjoy the warm weather and what better way to do so than with a fun dessert with elements of a summer favorite? I shared this a couple weeks ago over at One Artsy Mama and am now sharing it with all of you....

S'mores Cookie Bars...just the name makes my mouth water! You start with a buttery graham cracker crust, fill with your favorite cookie recipe, and top with toasted marshmallows. Simple, but fabulous!

A plate full of yumminess!


S'mores Cookie Bars

For the crust:

1 1/2 cups graham cracker crumbs (about 10 crackers)
1/3 cup sugar
6 tablespoons melted unsalted butter

Mix all ingredients together with a fork and press into the bottom of a nine inch square pan. I then added a layer of semi sweet chocolate chips and white chocolate chips...you know...cuz you can never have enough chocolate!

For the cookies, I used my new favorite gluten free chocolate chunk cookie  mix. I know that the graham crackers aren't gluten free so this can't be labeled GF but I just really love this mix! If you have a favorite mix or homemade cookie recipe, feel free to use it! The one I use is a Pamela's gluten free mix that is just fabulous!
Source

Carefully press the cookie dough over the chocolate chips and crust and bake at 350 degrees until cookies are just about finished (literally, just about finished). I pulled mine out when they were starting to brown on the edges but still soft in the center (I like my cookies soft and chewy...not crispy). Top with marshmallows and place under the broiler until toasted. Once cooled, cut and serve brownies, and be ready for the sighs of bliss.  I also added broken up graham crackers and pieces of a milk chocolate bar. Seriously, these are just delicious! Obviously, you could also make S'mores Brownies by replacing the cookie dough with your favorite brownie batter....yum!


I don't know about you all but I'm totally excited about fall being just around the corner! It's my favorite time of year, especially for baking - pumpkin, cinnamon, sweet potatoes, apples, molasses - oh man! I just can't wait!!

Until next time, happy reading and more importantly, happy cupcake-ing!

Wednesday, September 12, 2012

Fabulous GF Deals!

I'm so excited to share some exciting news with you today! I've found an awesome website that sells TONS of GF (and other nutrition) products at really great prices. Anyone who's had to or just decided to change their diet to a more healthful way of eating knows that it can get pretty expensive. As a coupon shopper who buys by the sales flyer I am always looking for a better deal and it's gotten harder since I've gone gluten free. Well, I have good news, my friends! 

Vitacost.com has fantastic deals and a huge selection! I love the products from Pamela's and Bob's Red Mill but have been a little overwhelmed when it comes time to pay the bills. No more! Look at what I got in the mail yesterday...


Trust me...I did a little happy dance when I opened this box! There are 15 different GF mixes, flours, and other baking ingredients here and I can't wait to try each and every one! Now, here's the best part. The retail  value of this package is around $85...throw in shipping costs and its easily $100. Don't worry...I didn't pay that much and you won't have to either. Thanks to their awesome referral program and shipping discounts, I got the entire box full for $49.34! I know! 

Wanna get these awesome products at these fabulous prices? Just follow the link below for your $10 discount and check the site for deals on shipping! You won't be disappointed, I promise!! 


Be watching for some yummy goodness using these products soon! Until next time, happy reading and more importantly, happy GF baking!!


This post was not a sponsored post. The opinions are 100% mine and I received no compensation in exchange for writing it. 

Thursday, September 6, 2012

Salted Caramel Apple {Cupcakes}

Good morning, friends! A couple weeks ago I was a guest over at Wait Til Your Father Gets Home for Meredith's Back to School series. When she asked me to be a guest I immediately started researching a fun, delicious back to school treat and I think you're gonna love what I came up with!

You know the whole thing about apples and teachers? Well, today I'm sharing with you a treat that is sure to give your kids "teacher's pet" status! Here it is...

Salted Caramel Apple {Cupcakes} for Teacher

I know, I know...does it get any better than this?


These are so fun and delicious. You don't even have to be a teacher to enjoy them! Moist, apple spice cupcakes, topped with salted caramel buttercream, dipped in royal icing with a pretzel and green candy for the finishing touch. What teacher wouldn't be delighted to have one of these beauties sitting on her desk?

Spiced Apple Cupcakes (This is a Martha Stewart recipe that I made no changes to because, well, it's practically perfect just as it is)

  • 2 1/4 cups all-purpose flour
  • 2 teaspoons baking soda
  • 2 teaspoons ground cinnamon
  • 1/2 teaspoon ground nutmeg
  • 1 teaspoon salt
  • 8 tablespoons (1 stick) unsalted butter, softened
  • 2 cups sugar
  • 2 large eggs
  • 1 teaspoon vanilla extract
  • 4 cups coarsely shredded apples (I used 3 granny smith and 3 red delicious)

  • Preheat oven to 350 degrees. Line standard muffin tins with paper liners; set aside. Whisk together flour, 
  • baking soda, cinnamon, nutmeg, and salt in a medium bowl; set aside.
  •  
  • Cream butter and sugar on medium-high speed in the bowl of a mixer fitted with the paddle until pale and 
  • fluffy, about 5 minutes. Mix in eggs and vanilla.

  • Reduce speed to low; mix in apples. Add flour mixture; mix, scraping down sides of bowl as needed, until
  •  just combined.

  • Fill lined cups halfway with batter; bake until tops are springy to the touch, 18 to 20 minutes.

Salted Caramel Buttercream 

2 sticks salted butter
2 cups dark brown sugar
2/3 cup heavy cream
1/2 teaspoon salt
3 cups powdered sugar

Melt butter in med saucepan. Add brown sugar and heavy cream and stir until sugar is dissolved. Add salt. Continue stirring and let bubble for one minute. 

Remove from heat and let cool while stirring. 

Mix in powdered sugar, one cup at a time, until desired consistency is reached. Cover with plastic wrap, touching icing, until ready to use. 


To make each "apple", pipe buttercream onto cupcake with a round tip, starting on the outside, moving inward in a circular motion. Don't over-frost. The icing is very rich so a little goes a long way. Plus, you don't want it to be too heavy when it comes time to dip into royal icing

Let iced cupcakes rest a little while, allowing the buttercream to form a crust. Then, carefully dip into thinned out, red royal icing, gently shaking off any excess before turning over. For the "stem", break a pretzel stick in half and insert into top of cupcake before icing sets. 

For the "leaves" I used spearmint leaf candies and cut them into smaller leaf shapes. You can free hand this. It shouldn't be stressful or hard...just make a basic, triangular leaf shape and don't worry about them matching perfectly. Attach leaf next to the "stem" and refrigerate cupcakes to allow royal icing to set.


Voila! The perfect bushel of beautiful red apples! I hope you enjoy making these as much as I did. The look on your kids and their teacher's faces will be well worth the work...I promise!
Until next time, happy reading and more importantly, happy cupcake-ing!

Monday, September 3, 2012

Bring on Fall With Gluten Free Chocolate Chip Pumpkin Muffins

Hey friends! I hope you're all enjoying the long weekend with your family and friends. I headed over to my sister's to help her get the baby's room set up. Today I'm sharing a fabulous gluten free recipe with all of you. As you know, I recently found out that I have a gluten sensitivity so I've had to learn a whole new way of eating. I've already shared GF Blueberry Muffins  and GF Chocolate Cherry Cheesecake which was a huge hit at my office.

Today's GF recipe is for Chocolate Chip Pumpkin Muffins in honor of my favorite season just around the corner - fall! I absolutely love this time of year - the changing leaves, beautiful colors, and all of the wonderful fall flavors and scents. I pretty much love pumpkin anything so when I found this recipe I just had to try it! If you've never tried combining chocolate and pumpkin you MUST! The two of them together is a match made in heaven.


GF Chocolate Chip Pumpkin Muffins (source)

2 cups white rice flour 
1 1/2 tsp. baking powder
1/2 tsp. baking soda
1/4 tsp. salt
1/2 C brown sugar
1/4 cup white sugar
1/2 tsp cinnamon
1/2 tsp nutmeg
1/4 tsp clove
1/4 tsp allspice
2 eggs, beaten
1/2 tsp GF vanilla 
1 1/2 cups canned pumpkin puree
1/2 cup canola oil
1 cup semi sweet chocolate chips
Optional: Sprinkle top with raw sugar

Preheat oven to 375F. Prepare a muffin pan by either greasing with shortening or lining with liners.
Combine dry ingredients in a large bowl and whisk together. Make a well in the center and add your eggs, vanilla, pumpkin, and canola oil. Gently fold ingredients together. When combined, spoon into your pan. If desired you can sprinkle top with raw sugar and more chocolate chips. Bake for about 30 minutes or until a toothpick comes out clean.


These are really tasty and only get better with time. All the flavors combine really well and come out stronger a day or two after baking.

I'm finding that living gluten free really isn't all that hard and I feel so much better! I encourage you, if you're having any health issues and nothing is working - medicines, therapy, doctor visits - PLEASE look at what you're eating and see if there's something you can change. It is working so well for me and so many others!!

Be sure to stop by One Artsy Mama where yours truly is sharing a delicious S'mores Cookie Bars recipe!!

Until next time, happy reading and more importantly, happy cupcake-ing!

Saturday, September 1, 2012

I'm a Blog Angel


Hey friends! Remember back in June when I posted about being a blog angel? Well, I signed up again for the month of August and it's time for the big reveal. I lost all track of time and forgot about the midway post (duh!) but here I am with the reveal post....

Oh Hey Brittany

Meet my angel-ee (yes, that is the official term)!  I was an angel to a sweet girl named Brittany over at Oh Hey Brittany! She's super cute and fairly new to the blog world so be sure to stop by, say hello, and show her some support and encouragement. I did my best to comment whenever she posted and shared, shared, shared on facebook and twitter. My last act as her angel is to offer her a one month ad space on my blog to spread the word!

If you haven't been a part of the awesome Blog Angel event before, make sure to stop by Craftbotic and check it out. The next round starts in October so don't miss out on the opportunity to be blessed and, more importantly, be a blessing to someone else!


Until next time, happy reading and more importantly, happy cupcake-ing!


Thursday, August 30, 2012

GF Chocolate Cherry Cheesecake

Hey friends! Today I'm sharing another delicious gluten free recipe. And, seriously, I mean delicious. It was for another birthday at work and the birthday boy loves cheesecake, chocolate, and cherry pie. Sooo...I decided to put them all together into one fabulous dessert!


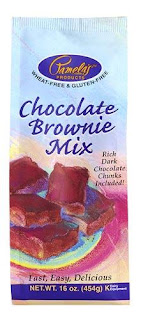
Doesn't that look heavenly? It consists of a brownie crust, creamy cheesecake, cherry pie filling, and a milk chocolate drizzle. Now, a fellow co-worker and myself are both eating gluten free so I wanted to make sure that we could partake. I turned to my new favorite baking mix company - Pamela's - and used the Chocolate  Brownie Mix for the crust.

Image Source
I followed the regular brownie recipe on the package and poured it into a springform pan. 

For the cheesecake I followed a fabulous Ina Garten recipe, only using the part for the filling...

Cheesecake (adapted from here)

  • 2 1/2 pounds cream cheese, at room temperature
  • 1 1/2 cups sugar
  • 5 whole extra-large eggs, at room temperature
  • 2 extra-large egg yolks, at room temperature
  • 1/4 cup sour cream
  • 1 tablespoon grated lemon zest 
  • 1 1/2 teaspoons pure vanilla extract
Preheat oven to 450 degrees.

Cream the cream cheese and sugar in the bowl of an electric mixer fitted with a paddle attachment on medium-high speed until light and fluffy, about 5 minutes. Reduce the speed of the mixer to medium and add the eggs and egg yolks, 2 at a time, mixing well. Scrape down the bowl and beater, as necessary. With the mixer on low, add the sour cream, lemon zest, and vanilla. Pour over unbaked brownie batter.

Bake for 15 minutes. Turn the oven temperature down to 225 degrees F and bake for another 1 hour and 15 minutes. Turn the oven off and open the door wide. The cake will not be completely set in the center. Allow the cake to sit in the oven with the door open for 30 minutes. Take the cake out of the oven and allow it to sit at room temperature for another 2 to 3 hours, until completely cooled. Remember, cake will NOT be completely set in the center at this point. It WILL set up in the refrigerator. Wrap and refrigerate overnight.

Remove the cake from the springform pan by carefully running a hot knife around the outside of the cake. Leave the cake on the bottom of the springform pan for serving. Top with your favorite GF cherry pie filling ( I used Lucky Leaf ) and drizzle with melted milk chocolate.


Yes, this cheesecake IS as good as it looks. And, GF-ers, feel free to indulge without any repercussions. Well, at least, gluten-related repercussions. I can't account for your scale reading changing or clothes not fitting quite right. I'm not a miracle worker after all! :) Enjoy!

Until next time, happy reading and more importantly, happy cupcake-ing!!

Monday, August 27, 2012

She's Ready to POP ~ A Baby Shower for My Sister

That's right...it's time for the big shower reveal. SO much work was involved in making this day special for my sister but it was completely worth it!

Me & the Mommy-to-Be

We are so excited and can't wait to meet Skylar Jayde in about 8 weeks or so! About 40 women gathered together to celebrate her anticipated arrival and lots of fun ensued. We had tons of "POP" themed food....

Can't believe I didn't notice the foil over the POPcorn chicken before taking this picture!

The savories...

Stuffed Mushroom "POP"pers

Ham & Swiss and Turkey & Cheddar "POP"py Seed Sliders

"POP" Some Veggies - had to get creative with that one!

As was mentioned before we also had popcorn chicken but I didn't get a picture of that.

The sweets....

Blow "POP"s, "POP" Rocks, and "POP" some Bubble Gum

Fruit "POP"s

Lemon "POP"py Seed Muffins

White Chocolate "POP"corn

Pretzel "POP"s

Snap, Crackle, and "POP" Treats

We also had Soda POP, Mini Cupcakes topped with Bubble Gum, and bottles of water in a cooler with frozen pink and green water balloons as ice. Unfortunately, I was so busy that day that I forgot to get photos of these things. 

The decorations...

Above the food table

For the centerpiece above the table I made tissue paper pom poms and hung them with fishing wire. The "S" was made using a large white wooden letter from Michaels that I decorated with pink and green washi tape. The inspiration came from this post over at One Artsy Mama.

"Skylar" Bunting in background

I'm so mad at myself that I forgot to snap a photo of the "POP on in" sign that we hung on the front door. My mom and I made it using a sheet of chalkboard "paper" I got from PYP. We framed it with a white wooden frame from Michaels and then put a fancy pink lace tape border around the chalkboard and decorated the border with pink and green flower stickers. The description doesn't do it justice!

We also played a few games. The first was a party standard that, I'm sure, will be familiar to you all. I filled a pink bottle with green M&Ms and had the ladies write down their guess of how many were in the bottle. The winner got to keep the bottle of candy. Next was the "He Said/She Said Pop Quiz. This was so fun. I asked 10 questions about Skylar and my sister and BIL both answered each one. The ladies at the party had to guess who gave which answer. The winner of this game got a $10 Publix gift card. An easy game was a Thank You envelope raffle. We had each guest write their name and address on an envelope that my sis can later use to send her thank you cards and then put them in a bowl and I picked a winner. This winner got a stationary and pen set. The last game was Things That POP. Guests were given two minutes to write down everything they could think of that POPs. This was too funny! The winner had 14 items and got a POPcorn gift pack as her prize.

I got lots of inspiration from all over the internet and am so happy with how it all turned out. My sis had a blast and knows beyond a shadow of a doubt that she, my brother-in-law, and that precious little baby are truly loved and have plenty of support for the days ahead!

Until next time, happy reading and more importantly, happy cupcake-ing!

Related Posts Plugin for WordPress, Blogger...